本页还没有译文
本页 150 段还没译成한국어,下面显示的是英文原文。Get Started
还没翻译译自英文(langfuse.com)本页 150 段都还没译
Get Started with Tracing
This guide walks you through ingesting your first trace into Langfuse. If you're looking to understand what tracing is and why it matters, check out the Observability Overview first. For details on how traces are structured in Langfuse and how it works in the background, see Core Concepts.
Langfuse is open source. Use Langfuse Cloud (hosted by Langfuse, free tier, no infrastructure to run) or self-host it. The instrumentation code is the same for both.
Agentic installation
Install the Langfuse Agent Skill to let your coding agent access all Langfuse features. If your agent supports MCP, also add the Langfuse Docs MCP server (https://langfuse.com/api/mcp, no authentication) so it can look up current documentation while it works.
Ask your coding agent to install the skill by pointing to the GitHub repository and instruct it to get started with tracing.
Install the Langfuse Agent Skill from github.com/langfuse/skills
and use it to add tracing to this application with Langfuse
following best practices.
Langfuse has a Cursor Plugin that includes the skill automatically.
Then prompt your agent:
Add tracing to this application with Langfuse following best practices.Install via npm (skills CLI):
npx skills add langfuse/skills --skill "langfuse"If you want to target a specific agent directly:
npx skills add langfuse/skills --skill "langfuse" --agent "<agent-id>"Then prompt your agent:
Add tracing to this application with Langfuse following best practices.Manual installation
This guide helps you get started with Langfuse tracing manually.
Get API keys
- Create Langfuse account or self-host Langfuse.
- Create new API credentials in the project settings.
Ingest your first trace
Choose your framework, SDK, or OpenTelemetry setup to get started. If your
application already emits OTEL spans, start with the OpenTelemetry guide.
(Langfuse calls spans observations; span is also a specific observation type.)
Langfuse's OpenAI SDK is a drop-in replacement for the OpenAI client that automatically records your model calls without changing how you write code. If you already use the OpenAI python SDK, you can start using Langfuse with minimal changes to your code.
Start by installing the Langfuse OpenAI SDK. It includes the wrapped OpenAI client and sends traces in the background.
pip install langfuseSet your Langfuse credentials as environment variables so the SDK knows which project to write to.
LANGFUSE_SECRET_KEY = "sk-lf-..."
LANGFUSE_PUBLIC_KEY = "pk-lf-..."
LANGFUSE_BASE_URL = "https://cloud.langfuse.com" # 🇪🇺 EU region
# Other Langfuse data regions include 🇺🇸 US: https://us.cloud.langfuse.com, 🇯🇵 Japan: https://jp.cloud.langfuse.com and ⚕️ HIPAA: https://hipaa.cloud.langfuse.com
Swap the regular OpenAI import to Langfuse’s OpenAI drop-in. It behaves like the regular OpenAI client while also recording each call for you.
from langfuse.openai import openaiUse the OpenAI SDK as you normally would. The wrapper captures the prompt, model and output and forwards everything to Langfuse.
completion = openai.chat.completions.create(
  name="test-chat",
  model="gpt-4o",
  messages=[
      {"role": "system", "content": "You are a very accurate calculator. You output only the result of the calculation."},
      {"role": "user", "content": "1 + 1 = "}],
  metadata={"someMetadataKey": "someValue"},
)Langfuse's JS/TS OpenAI SDK wraps the official client so your model calls are automatically traced and sent to Langfuse. If you already use the OpenAI JavaScript SDK, you can start using Langfuse with minimal changes to your code.
First install the Langfuse OpenAI wrapper. It extends the official client to send traces in the background.
Install packages
Install the Langfuse OpenAI wrapper, the official OpenAI SDK, and the Langfuse OpenTelemetry integration required for tracing.
npm install @langfuse/openai openai @langfuse/otelAdd credentials
Add your Langfuse credentials to your environment variables so the SDK knows which project to write to.
LANGFUSE_SECRET_KEY = "sk-lf-..."
LANGFUSE_PUBLIC_KEY = "pk-lf-..."
LANGFUSE_BASE_URL = "https://cloud.langfuse.com" # 🇪🇺 EU region
# Other Langfuse data regions include 🇺🇸 US: https://us.cloud.langfuse.com, 🇯🇵 Japan: https://jp.cloud.langfuse.com and ⚕️ HIPAA: https://hipaa.cloud.langfuse.com
Initialize OpenTelemetry
Install the OpenTelemetry SDK, which the Langfuse integration uses under the hood to capture the data from each OpenAI call.
npm install @opentelemetry/sdk-nodeNext is initializing the Node SDK. You can do that either in a dedicated instrumentation file or directly at the top of your main file.
Inline setup
The inline setup is the simplest way to get started. It works well for projects where your main file is executed first and import order is straightforward.
We can now initialize the LangfuseSpanProcessor and start the SDK. The LangfuseSpanProcessor is the part that takes that collected data and sends it to your Langfuse project.
Important: start the SDK before initializing the logic that needs to be traced to avoid losing data.
import { NodeSDK } from "@opentelemetry/sdk-node";
import { LangfuseSpanProcessor } from "@langfuse/otel";

const sdk = new NodeSDK({
  spanProcessors: [new LangfuseSpanProcessor()],
});

sdk.start();
Instrumentation file
The instrumentation file often preferred when you're using frameworks that have complex startup order (Next.js, serverless, bundlers) or if you want a clean, predictable place where tracing is always initialized first.
Create an instrumentation.ts file, which sets up the collector that gathers data about each OpenAI call. The LangfuseSpanProcessor is the part that takes that collected data and sends it to your Langfuse project.
import { NodeSDK } from "@opentelemetry/sdk-node";
import { LangfuseSpanProcessor } from "@langfuse/otel";

const sdk = new NodeSDK({
  spanProcessors: [new LangfuseSpanProcessor()],
});

sdk.start();
Import the instrumentation.ts file first so all later imports run with tracing enabled.
import "./instrumentation"; // Must be the first importWrap your normal OpenAI client. From now on, each OpenAI request is automatically collected and forwarded to Langfuse.
Wrap OpenAI client
import OpenAI from "openai";
import { observeOpenAI } from "@langfuse/openai";

const openai = observeOpenAI(new OpenAI());

const res = await openai.chat.completions.create({
    messages: [{ role: "system", content: "Tell me a story about a dog." }],
    model: "gpt-4o",
    max_tokens: 300,
});Vercel AI SDK
Langfuse's Vercel AI SDK integration uses OpenTelemetry to automatically trace your AI calls. If you already use the Vercel AI SDK, you can start using Langfuse with minimal changes to your code.
Install packages
Install AI SDK 7, OpenTelemetry, and the Langfuse integration packages.
npm install ai @ai-sdk/openai @langfuse/vercel-ai-sdk @langfuse/tracing @langfuse/otel @opentelemetry/sdk-nodeAdd credentials
Set your Langfuse credentials as environment variables so the SDK knows which project to write to.
LANGFUSE_SECRET_KEY = "sk-lf-..."
LANGFUSE_PUBLIC_KEY = "pk-lf-..."
LANGFUSE_BASE_URL = "https://cloud.langfuse.com" # 🇪🇺 EU region
# Other Langfuse data regions include 🇺🇸 US: https://us.cloud.langfuse.com, 🇯🇵 Japan: https://jp.cloud.langfuse.com and ⚕️ HIPAA: https://hipaa.cloud.langfuse.com
Initialize OpenTelemetry with Langfuse
Set up the OpenTelemetry SDK with the Langfuse span processor and register the Langfuse Vercel AI SDK telemetry integration once at application startup.
import { registerTelemetry } from "ai";
import { NodeSDK } from "@opentelemetry/sdk-node";
import { LangfuseSpanProcessor } from "@langfuse/otel";
import { LangfuseVercelAiSdkIntegration } from "@langfuse/vercel-ai-sdk";

const sdk = new NodeSDK({
  spanProcessors: [new LangfuseSpanProcessor()],
});

sdk.start();

registerTelemetry(new LangfuseVercelAiSdkIntegration());
Run AI SDK calls
After telemetry is registered, AI SDK 7 emits telemetry by default. Use telemetry to set a function name, include selected runtime context keys, or opt out of telemetry for a specific call.
import { generateText } from "ai";
import { openai } from "@ai-sdk/openai";

const { text } = await generateText({
  model: openai("gpt-5.1"),
  prompt: "What is the weather like today?",
  telemetry: {
    functionId: "weather-chat",
  },
});
Full Vercel AI SDK documentation
LangChain (Python)
Langfuse's LangChain integration uses a callback handler to record and send traces to Langfuse. If you already use LangChain, you can start using Langfuse with minimal changes to your code.
First install the Langfuse SDK and your LangChain SDK.
pip install langfuse langchain-openaiAdd your Langfuse credentials as environment variables so the callback handler knows which project to write to.
LANGFUSE_SECRET_KEY = "sk-lf-..."
LANGFUSE_PUBLIC_KEY = "pk-lf-..."
LANGFUSE_BASE_URL = "https://cloud.langfuse.com" # 🇪🇺 EU region
# Other Langfuse data regions include 🇺🇸 US: https://us.cloud.langfuse.com, 🇯🇵 Japan: https://jp.cloud.langfuse.com and ⚕️ HIPAA: https://hipaa.cloud.langfuse.com
Initialize the Langfuse callback handler. LangChain has its own callback system, and Langfuse listens to those callbacks to record what your chains and LLMs are doing.
from langfuse.langchain import CallbackHandler

langfuse_handler = CallbackHandler()
Add the Langfuse callback handler to your chain. The Langfuse callback handler plugs into LangChain’s event system. Every time the chain runs or the LLM is called, LangChain emits events, and the handler turns those into traces and observations in Langfuse.
from langchain_openai import ChatOpenAI
from langchain_core.prompts import ChatPromptTemplate

llm = ChatOpenAI(model_name="gpt-4o")
prompt = ChatPromptTemplate.from_template("Tell me a joke about {topic}")
chain = prompt | llm

response = chain.invoke(
    {"topic": "cats"},
    config={"callbacks": [langfuse_handler]})
Full LangChain SDK documentation Notebook
LangChain (JS/TS)
Langfuse's LangChain integration uses a callback handler to record and send traces to Langfuse. If you already use LangChain, you can start using Langfuse with minimal changes to your code.
First install the Langfuse core SDK and the LangChain integration.
npm install @langfuse/langchain @langfuse/otel langchain @langchain/core @langchain/openai zodAdd your Langfuse credentials as environment variables so the integration knows which project to send your traces to.
LANGFUSE_SECRET_KEY = "sk-lf-..."
LANGFUSE_PUBLIC_KEY = "pk-lf-..."
LANGFUSE_BASE_URL = "https://cloud.langfuse.com" # 🇪🇺 EU region
# Other Langfuse data regions include 🇺🇸 US: https://us.cloud.langfuse.com, 🇯🇵 Japan: https://jp.cloud.langfuse.com and ⚕️ HIPAA: https://hipaa.cloud.langfuse.com
Initialize OpenTelemetry
Install the OpenTelemetry SDK, which the Langfuse integration uses under the hood to capture the data from each OpenAI call.
npm install @opentelemetry/sdk-nodeNext is initializing the Node SDK. You can do that either in a dedicated instrumentation file or directly at the top of your main file.
The inline setup is the simplest way to get started. It works well for projects where your main file is executed first and import order is straightforward.
We can now initialize the LangfuseSpanProcessor and start the SDK. The LangfuseSpanProcessor is the part that takes that collected data and sends it to your Langfuse project.
Important: start the SDK before initializing the logic that needs to be traced to avoid losing data.
import { NodeSDK } from "@opentelemetry/sdk-node";
import { LangfuseSpanProcessor } from "@langfuse/otel";

const sdk = new NodeSDK({
  spanProcessors: [new LangfuseSpanProcessor()],
});

sdk.start();
The instrumentation file often preferred when you're using frameworks that have complex startup order (Next.js, serverless, bundlers) or if you want a clean, predictable place where tracing is always initialized first.
Create an instrumentation.ts file, which sets up the collector that gathers data about each OpenAI call. The LangfuseSpanProcessor is the part that takes that collected data and sends it to your Langfuse project.
import { NodeSDK } from "@opentelemetry/sdk-node";
import { LangfuseSpanProcessor } from "@langfuse/otel";

const sdk = new NodeSDK({
  spanProcessors: [new LangfuseSpanProcessor()],
});

sdk.start();
Import the instrumentation.ts file first so all later imports run with tracing enabled.
import "./instrumentation"; // Must be the first importFinally, initialize the Langfuse CallbackHandler and add it to your chain. The CallbackHandler listens to the LangChain agent's actions and prepares that information to be sent to Langfuse.
import { CallbackHandler } from "@langfuse/langchain";

// Initialize the Langfuse CallbackHandler
const langfuseHandler = new CallbackHandler();
The line { callbacks: [langfuseHandler] } is what attaches the CallbackHandler to the agent.
import { createAgent, tool } from "langchain";
import * as z from "zod";

const getWeather = tool(
  (input) => `It's always sunny in ${input.city}!`,
  {
    name: "get_weather",
    description: "Get the weather for a given city",
    schema: z.object({
      city: z.string().describe("The city to get the weather for"),
    }),
  }
);

const agent = createAgent({
  model: "openai:gpt-5-mini",
  tools: [getWeather],
});

console.log(
    await agent.invoke(
        { messages: [{ role: "user", content: "What's the weather in San Francisco?" }] },
        { callbacks: [langfuseHandler] }
    )
);
Full Langchain SDK documentation
Python SDK
The Langfuse Python SDK gives you full control over how you instrument your application and can be used with any other framework.
1. Install package:
pip install langfuse2. Add credentials:
LANGFUSE_SECRET_KEY = "sk-lf-..."
LANGFUSE_PUBLIC_KEY = "pk-lf-..."
LANGFUSE_BASE_URL = "https://cloud.langfuse.com" # 🇪🇺 EU region
# Other Langfuse data regions include 🇺🇸 US: https://us.cloud.langfuse.com, 🇯🇵 Japan: https://jp.cloud.langfuse.com and ⚕️ HIPAA: https://hipaa.cloud.langfuse.com
3. Instrument your application:
Instrumentation means adding code that records what’s happening in your application so it can be sent to Langfuse. There are three main ways of instrumenting your code with the Python SDK.
In this example we will use the context manager. You can also use the decorator or create manual observations.
from langfuse import get_client

langfuse = get_client()

# Create a span using a context manager
with langfuse.start_as_current_observation(as_type="span", name="process-request") as span:
    # Your processing logic here
    span.update(output="Processing complete")

    # Create a nested generation for an LLM call
    with langfuse.start_as_current_observation(as_type="generation", name="llm-response", model="gpt-3.5-turbo") as generation:
        # Your LLM call logic here
        generation.update(output="Generated response")

# All spans are automatically closed when exiting their context blocks


# Flush events in short-lived applications
langfuse.flush()
When should I call langfuse.flush()?
4. Run your application and see the trace in Langfuse:
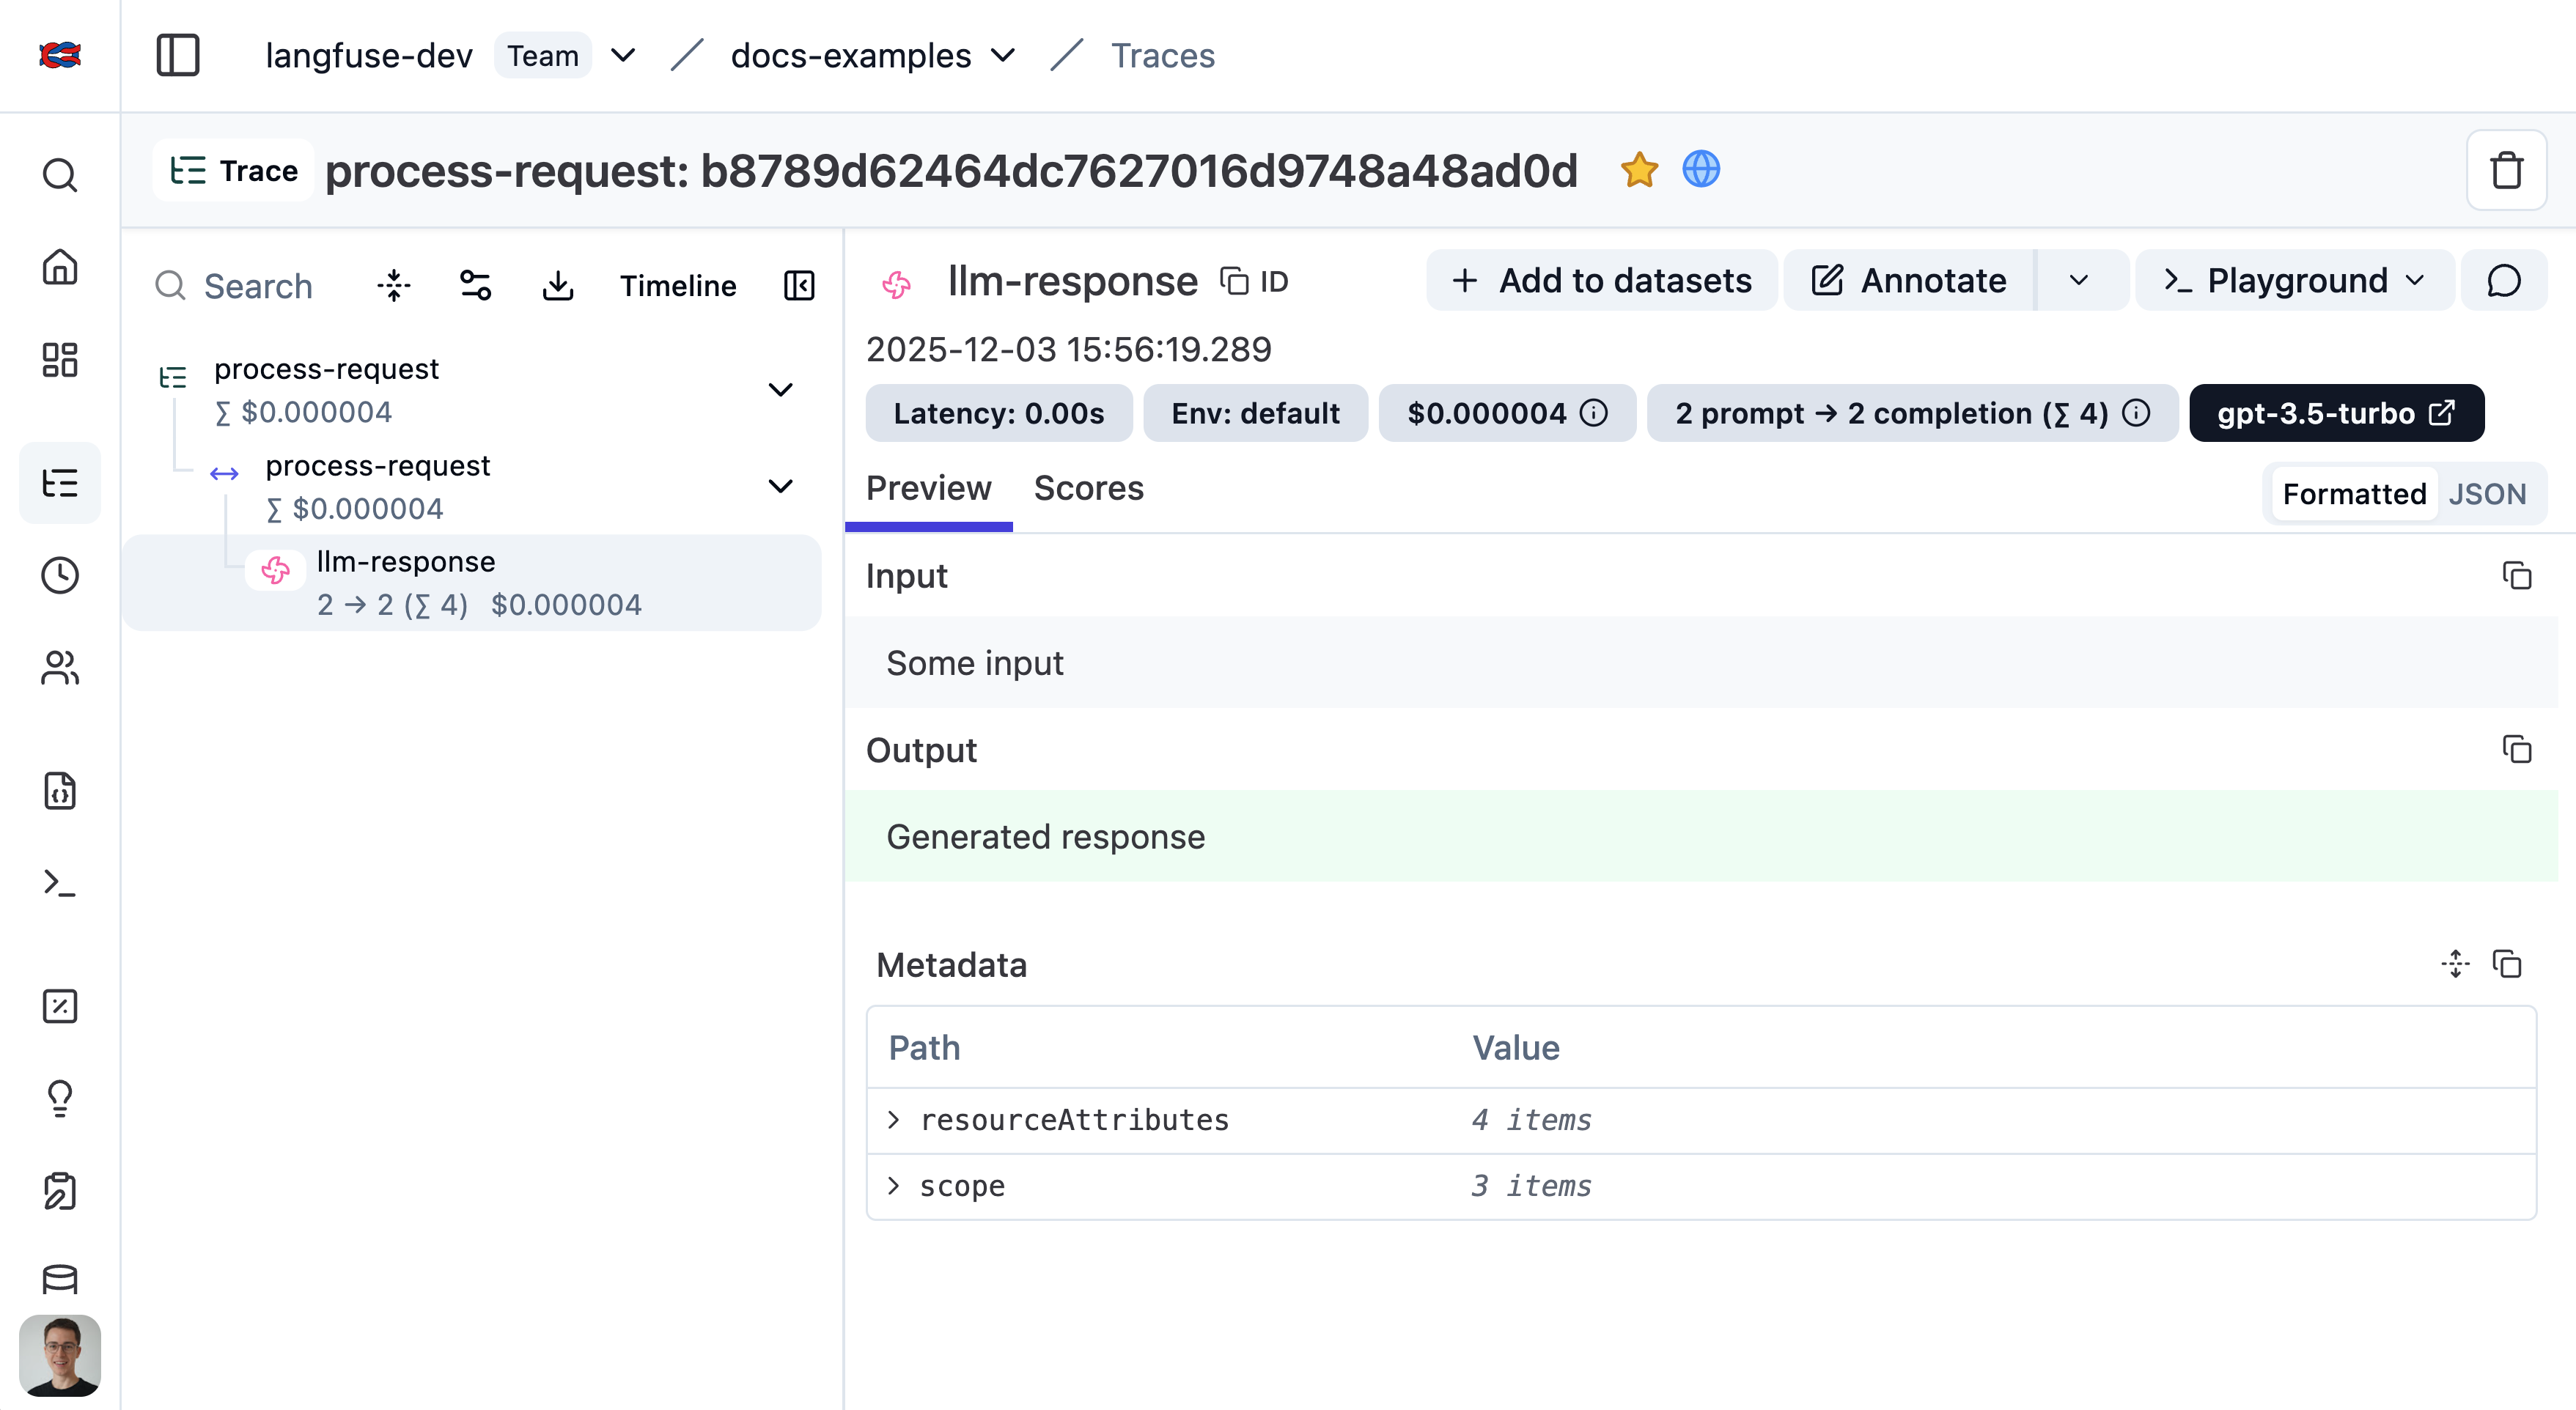
See the trace in Langfuse.
JS/TS SDK
Use the Langfuse JS/TS SDK to wrap any LLM or Agent
Install packages
Install the Langfuse tracing SDK, the Langfuse OpenTelemetry integration, and the OpenTelemetry Node SDK.
npm install @langfuse/tracing @langfuse/otel @opentelemetry/sdk-nodeAdd credentials
Add your Langfuse credentials to your environment variables so the tracing SDK knows which Langfuse project it should send your recorded data to.
LANGFUSE_SECRET_KEY = "sk-lf-..."
LANGFUSE_PUBLIC_KEY = "pk-lf-..."
LANGFUSE_BASE_URL = "https://cloud.langfuse.com" # 🇪🇺 EU region
# Other Langfuse data regions include 🇺🇸 US: https://us.cloud.langfuse.com, 🇯🇵 Japan: https://jp.cloud.langfuse.com and ⚕️ HIPAA: https://hipaa.cloud.langfuse.com
Initialize OpenTelemetry
Install the OpenTelemetry SDK, which the Langfuse integration uses under the hood to capture the data from each OpenAI call.
npm install @opentelemetry/sdk-nodeNext is initializing the Node SDK. You can do that either in a dedicated instrumentation file or directly at the top of your main file.
The inline setup is the simplest way to get started. It works well for projects where your main file is executed first and import order is straightforward.
We can now initialize the LangfuseSpanProcessor and start the SDK. The LangfuseSpanProcessor is the part that takes that collected data and sends it to your Langfuse project.
Important: start the SDK before initializing the logic that needs to be traced to avoid losing data.
import { NodeSDK } from "@opentelemetry/sdk-node";
import { LangfuseSpanProcessor } from "@langfuse/otel";

const sdk = new NodeSDK({
  spanProcessors: [new LangfuseSpanProcessor()],
});

sdk.start();
The instrumentation file often preferred when you're using frameworks that have complex startup order (Next.js, serverless, bundlers) or if you want a clean, predictable place where tracing is always initialized first.
Create an instrumentation.ts file, which sets up the collector that gathers data about each OpenAI call. The LangfuseSpanProcessor is the part that takes that collected data and sends it to your Langfuse project.
import { NodeSDK } from "@opentelemetry/sdk-node";
import { LangfuseSpanProcessor } from "@langfuse/otel";

const sdk = new NodeSDK({
  spanProcessors: [new LangfuseSpanProcessor()],
});

sdk.start();
Import the instrumentation.ts file first so all later imports run with tracing enabled.
import "./instrumentation"; // Must be the first importInstrument application
Instrumentation means adding code that records what’s happening in your application so it can be sent to Langfuse. Here, OpenTelemetry acts as the system that collects those recordings.
import { startActiveObservation, startObservation } from "@langfuse/tracing";

// startActiveObservation creates a trace for this block of work.
// Everything inside automatically becomes part of that trace.
await startActiveObservation("user-request", async (span) => {
  span.update({
    input: { query: "What is the capital of France?" },
  });

  // This generation will automatically be a child of "user-request" because of the startObservation function.
  const generation = startObservation(
    "llm-call",
    {
      model: "gpt-4",
      input: [{ role: "user", content: "What is the capital of France?" }],
    },
    { asType: "generation" },
  );

  // ... your real LLM call would happen here ...

  generation
    .update({
      output: { content: "The capital of France is Paris." }, // update the output of the generation
    })
    .end(); // mark this nested observation as complete

  // Add final information about the overall request
  span.update({ output: "Successfully answered." });
});
Full JS/TS SDK documentation Notebook
OpenTelemetry (API)
Send OTLP spans straight to the Langfuse API from an OTEL SDK, a collector,
or plain curl:
export LANGFUSE_PUBLIC_KEY="pk-lf-..."
export LANGFUSE_SECRET_KEY="sk-lf-..."
export LANGFUSE_HOST="https://cloud.langfuse.com" # EU region

TRACE_ID=$(openssl rand -hex 16)
SPAN_ID=$(openssl rand -hex 8)
START=$(($(date +%s) * 1000000000))

curl -X POST "$LANGFUSE_HOST/api/public/otel/v1/traces" \
  -u "$LANGFUSE_PUBLIC_KEY:$LANGFUSE_SECRET_KEY" \
  -H "Content-Type: application/json" \
  -H "x-langfuse-ingestion-version: 4" \
  --data-binary @- <<JSON
{"resourceSpans": [{"scopeSpans": [{"spans": [{
  "traceId": "$TRACE_ID",
  "spanId": "$SPAN_ID",
  "name": "hello-langfuse",
  "startTimeUnixNano": "$START",
  "endTimeUnixNano": "$((START + 1000000))",
  "attributes": [
    {
      "key": "langfuse.observation.input",
      "value": {"stringValue": "Hello, Langfuse!"}
    },
    {
      "key": "langfuse.observation.output",
      "value": {"stringValue": "Hello from curl!"}
    }
  ]
}]}]}]}
JSON
Point LANGFUSE_HOST at your data region or
self-hosted deployment. See the OpenTelemetry property
mapping to add model,
usage, user, session, and other Langfuse attributes.
More integrations
Explore all integrations and frameworks that Langfuse supports.
OpenTelemetry (OTEL) Vercel AI SDK Llamaindex CrewAI Ollama LiteLLM AutoGen Google ADK All integrations
See your trace in Langfuse
After running your application, visit the Langfuse interface to view the trace you just created. (Example LangGraph trace in Langfuse)
What does a good trace look like?
Not seeing what you expected?
If your trace looks overly complicated or overwhelming, the tracing setup itself may need a second look. Compare it against our best practices guide.
Next steps
Now that your first trace is in Langfuse, learn to make sense of your traces by reading the chapter on Monitoring in the Langfuse Academy.
Or if you know exactly what you're looking for, here are the most common features:
- Group traces into sessions for multi-turn applications
- Attribute traces to individual users
- Add attributes to your traces so you can filter them later
- Track model usage and cost
- Monitor application quality with scores
- Get notified when a metric crosses a threshold with alerts
- Analyze cost, latency, volume, and quality in custom dashboards
Take a look under Features in the sidebar for guides on specific topics.